
Introduction
The Barrows Brothers  are mainly camped by high-level players in an effort to obtain the Graverobber title. The brothers are relatively weak, with the exception of Linza.
Useful Unlocks
⬥ Completing all Hard Morytania achievements:
• Doubles rune drops
• Allows you to bank loot directly from the chest
⬥ Completing all Easy Combat Mastery Achievements:
• Portals will permanently appear in corner & central rooms of the underground crypt
⬩ Teleporting via these portals circumvents the need to to solve puzzles or open doors
⬥ Bringing a Dragon/Barrows defender allows for additional defender components. Corrupted sigils can be dissasembled for undead components
The Fight
Suggested order for killing the brothers:
Linza → Ahrim → Verac → Akrisae → Torag → Karil → Guthan → Dharok
General Strategy
⬥ It is recommended to be on an Undead slayer task to benefit from the slayer helmet  and Guardhouse boosts
⬥ You can pre-vuln by using  on the ground after clicking the sarcophagus
⬥ Bringing a spade and using it to dig in order to enter the mounds is quicker
⬥ Good movement can improve the efficiency of your runs, below are some examples starting at Dharok's crypt:
• Guthan last
• Akrisae last
• Karil last
• Torag last
Necromancy
Preset and Relics
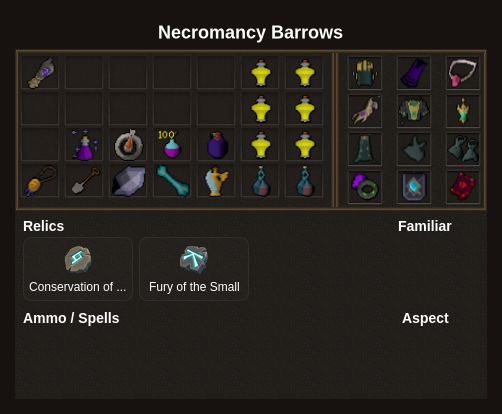
Rotations
Renew conjures as needed
Default to  →
 for all regular brothers. Use
 to skip Akrisae
Use  when moving between brothers
Linza and Ahrim
 → →
 +
 →
 to Linza → (tc) +
 + →
 →
 →

 → (
 )
Notes:
⬥ as you click on Ahrim's tomb
⬥ Run over to Ahrim whilst doing the rotation, be sure to not run out of range
Example Kills
Magic
Preset and Relics
⬥ Magic

⬥ Augmented gear piece has Equilibrium 4  Undead Slayer

Rotations
⬥ Autocast 
• Lunging is recomended on the orb but not necessary, Linza might take an additional ability without it
⬥ Can use to skip any brother other than Linza
• This guide assumes you don't use them
• This guide assumes you reset at War's Retreat after every run
⬥ Use  while running to Ahrim, you still want enough time on runic to use the second Linza rotation if Ahrim is in the tunnel
Ahrim
Use while running to Ahrim (tc) +  →

Note: move towards Linza while using the abilities.
Linza
(tc) + →  →
 →
 if reset again otherwise
 →

Ahrim Tunnel
(tc) + → → → → if reset again otherwise
Dharok
(tc) + 
Note: use while running to Guthan
Guthan
(tc) +
Karil
(tc) +
Torag
(tc) +
Notes:
⬥  if low adrenaline (below 25%)
⬥ Use as soon as possible
Verac
(tc) +
Akrisae
(tc) +
Example Kills
Melee
Presets and Relics
⬥ Melee

⬥ Expect approximately 48 kph
⬥ Can downgrade gear, but you may need to use extra abilities
Rotations
⬥ Pray  +

War's Retreat
 → 120 adren →
 → 120 adren
Dharok
 + click +
 → dig →
Ahrim + Linza
+  + + equip
 → TC +
 + →
 →

Verac

Akrisae

Torag, Karil, Guthan
→  →
Notes:
⬥ If on Akrisae then skip
Example Kills
Ranged
Presets and Relics
⬥ Ranged

Rotations
War's Retreat
 → 100% adren → portal
Dharok
Dig +  →

Ahrim + Linza
Spawn Ahrim and run to Linza whilst  → (tc) Linza + +
 →
 →
 + move towards stairs →
Verac
Akrisae
Torag, Karil, Guthan
Notes:
⬥ Apart from Linza and Akrisae, you should target cycle + + click stairs to leave as one-shots with the given setup
⬥ If you don't have 100% adren leaving Linza, use  which also one-shots with this setup
⬥ If Dharok is the tunnel, Ahrim
⬥ If Ahrim is tunnel, Linza first
⬥ If you don't want to use barrows amulets, Akrisae
Example Kills
Source record
By PvME contributors under CC BY-NC-SA 4.0. Navigation and typography adapted. Original sanitized source HTML and its text hash are retained separately. Source channel and message references are repaired using the pinned guide repository and public directory/identity evidence; navigation wording is adapted for the web. Every change is recorded in the reference repair ledger. Unverified destinations and contributor names remain explicitly unavailable. Legitimate external community and attribution links are preserved and labeled. Original media is embedded from providers; media rights are separate from guide-text rights.
Captured 2026-11-10T14:25:29Z. Game-version accuracy is unverified.
MediaWiki draft ↓